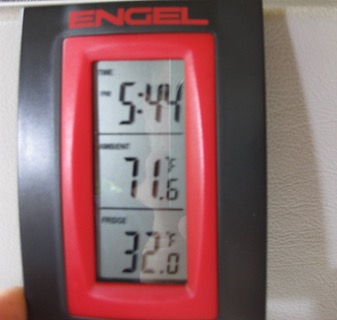
Engel Fridge Temperature Gauge

After having our Norcold fridge fail on us (fuse blew on the DC heater) during a long slog up the coast on a rainy Thanksgiving (fortunately all the leftovers were in another ice chest!), I decided that I needed a way to monitor the fridge temperature remotely. I found that Engel (makers of electric coolers) have a remote temperature accessory – Amazon link that looked to be a perfect solution.

For my recent month long trip to Peru*, I needed to keep certain medical supplies between freezing and 46 degrees – so monitoring the temperature was critical.

I mounted the unit on the dashboard using INDUSTRIAL Velcro, as well as creating a mounting spot next to the fridge:

There is a remote sending unit that I mounted on the inside “roof” of the fridge (no photo). The Amazon link shows the displays on the device.

The unit uses AAA batteries, and they will last you AT LEAST one month of 24/7 operation. The unit could use a backlight for nighttime, but I don’t mind the tradeoff for long battery life. It also displays the time and ambient temperature.

The remote connection was “lost” only 3 times during my trip – twice I feel it was due to the iPhone located nearby starting up in the AM. Repairing the connection requires removing the batteries from both units, then installing the batteries FIRST in the receiver, THEN in the remote. This also requires stepping through the menu to set the time and choosing Centigrade or Fahrenheit, but that process is simple.

This should be standard equipment with all fridges.

*(Indiana)

House battery disconnect

I wanted to have an easy way to disconnect my house battery for servicing 12 volt appliances, etc., so I added a battery disconnect switch – accessible via my rear access hatch – Adding a rear hatch.

I purchased a switch, and a short battery cable:

Here are some shots of inside the battery box – it is tight, but it all fits:

Drilled a hole in the battery box, rerouted the positive cable (sealing the new hole I drilled for it), connected the short cable from the battery to the switch, and that was it!

Luggage rack brackets

Above the EVC cab is a luggage rack – a plastic cover over the roof that has 2 handles for strapping boxes, bags, etc (see my post: Storage Box Above Cab). I received a stainless steel bracket kit to replace the existing steel brackets that attach this piece of plastic to the roof, so I thought I would take this piece of plastic off and see just what is going on underneath – man, I am glad I did!

dirt

Even if you have no intention of replacing the brackets, you should remove this luggage rack and clean underneath – mine was filthy!

The existing brackets are steel, attached with pop rivets and adhesive – adhesive ONLY on one side of the brackets. On my EVC, one bracket was only in place with pop rivets – the adhesive had failed on the other side.

Go Westy sells a stainless steel bracket replacement kit – this replaces the existing brackets with stainless steel ones, and provides for pop rivet mounting on both sides.

You need to clean the roof very well, drill some holes, seal with silicone, and install some pop rivets.

  • Two installation tips:
    1. There is not a hole drilled in the front bracket for the screw that connects the luggage rack to the front bracket – you will want to drill this hole BEFORE you mount the front bracket to the roof. Just use your old bracket as template for where to drill this hole. Drilling in stainless steel requires a slow drill speed and lots of pressure – you do not want to heat up the steel, you just want to “cut” it with the drill.
    2. While drilling the pilot holes for the pop rivets that mount over the headliner, you need to make sure you do not drill too far – you can make a drill stop with some fuel line – like so:

drill stop

Here the roof is all ready for the install:

clean

Norcold 3163 fridge removal and cleaning

Decided to tackle the job of removing the Norcold fridge (one of our favorite parts of the van) to check just what IS the condition of the burner box (the part that can be sometimes hard to start, or hard to keep lit). If you own a Camper, you really owe it to yourself to pull this fridge out and see what makes it tick – it will take the mystery and fear out of the thing.

If you are comfortable working with a gas barbecue, you can do this! Before you work on your fridge, just make sure the propane is OFF, that you are not plugged into “shore” power (AC), that your “house” battery is disconnected, and put out any cigarettes or open flames. Make sure you have some ventilation, too (like the van door open and maybe working in a carport or garage with the door up).

This is not that difficult – just sorta fussy, and you do need to be able to lift and move the fridge. You need the following tools and supplies:

  • 2 crescent wrenches (maybe 3, you’ll see why later) or a 13/16, 5/8 and probably a 9/16 (depending on what era your fridge is) open end wrench
  • Good philips screwdriver – make sure you have a good one – some of these screws are tight!
  • Compressed air or a “can” of air
  • Shop vac
  • Round file to modify the mounting flanges in the van to ease reinstallation and later removal
  • Permatex 81878 “Ultra Copper” silicone – for resealing the burner box – the existing gasket will fall apart when you remove it – or a new gasket
  • If you have never done this, you will likely need a NEW burner – Norcold part #621951
  • Soapy water or “gas leak detecting fluid” from a hardware store
  • Piece of thin plywood or similar to protect the van floor

Continue reading

Trailer wiring

We have a trailer hitch on our van (from Eurocampers) but we have had no power connection for hauling a trailer – until now. I wanted something that would handle both 4 pin an 7 pin connectors, so I got such a beast from Hopkins – here is it installed:

The trick was just how do I wire this into the Van? As usual, the ev_update list came through (thanks, Paul!). The way I did it was to connect everything on the passenger side – behind the taillight.

Here is what you need:

  • “Cold shrink” tape – AKA non-adhesive wire harness tape – can’t remember where I got mine (Eastwood?) but here is a link: Tape
  • Super 33 electrical tape – the only electrical tape to buy
  • Tie wraps
  • Hopkins connector
  • Hopkins trailer wiring isolator
  • Patience
  • Flexible (or small) hands
  • Wiring diagram of the taillights

Continue reading

Green Refrigerator Indicator

When we are driving, we switch the fridge onto battery power. If we are just going to stop for a short time, or if is in not too hot outside, we will switch the fridge off. The trick is how to remember that the fridge is on or off – it is pretty hard to see the indicator panel of the fridge while driving, and I can bug the passenger, but we came up with this solution:

Fridge Indicator:

OFF

ON

MaxxFan roof vent/fan

This is going to be a long post – I have lots of photos! I finally installed the Maxxair MaxxFan Ventillation Fan

I bought a few months ago – this was different than any other installations I have done, as it is a “destructive” install – once you do this, there is no going back to the original roof vent. Let me sum this up by saying that in my case, it was REALLY worth the time and trouble to do this. Here is why I wanted to undertake this:

I wanted to improve the ventilation in the van when parked with the top down – I have some cool “armored” cab vents, but having those and a passive roof vent was just not cutting it – especially traveling with a cat. I had heard about the MaxxFan vents for years (integrated rain cover, multi-speed fan, reversible direction fan, etc) and saw that someone had made the install on a , so I decided to try it myself.

Summary:

  • You can drive at freeway speeds with the vent open
  • You can really cool off the van when parked by using the fan
  • You can open and close the vent while driving (the driver can reach the control – just as on the stock vent)
  • You can keep the vent open during rain storms

Continue reading